Sunday, September 30, 2012

Samarra, Sketch 2

For this sketch I was trying not to use the smudge function in Procreate (the iPad drawing app).  This one used only the brushes.  Gray "paper", so the black and white lines contrasted each other.  I used a photograph as the base, a picture I took yesterday morning while she was chasing a lizard on the window in the dinning room.

  I consider the photograph base to be cheating a little, but I really like the results.  The photo lets me get all the proportions correct, then I can fill in the details, to get it to look right.

  Since I've never tried the gray background before this was also a learning exercise.  I'll probably be trying more of these.  And it give me a chance to take a so-so picture and make it something more.

Sunday, September 23, 2012

Samarra

I "cheated" on this one a little.  I used a picture of Mara in the background of this one to get the proportions right.  I still like the way it came out nice.


Saturday, September 22, 2012

Whirling Dervish


  The girls get feathers on Christmas morning... Nyala's favorite was the pheasant feather.  It's always amusing then they can entertain themselves...  (Sorry that it's dark and grainy.)


Knead Binky


  A few years back Mara adopted a shawl I was crocheting.  It was made from a fuzzy purple yarn that must of reminded Mara of her mother.  She would grab a mouthful of the shawl and start kneading it.  So I made her her own "Binky" so she would ruin my newly made shawl.

  The Binky is about 12x8 inches and bright blue.  Mara carries it around in her mouth.  We can hear her crying all the way across the house, sometimes after we've gone to bed.

  I finally caught her doing it the other day.  This carried on for 5 minutes or more.  It must give her comfort.  In the end, that's all that counts...


Nyala Sleeping

  A friend recommended a drawing program for the iPad.  So while sitting on the bed this afternoon I sketched this.


  I've got to try this more often....

Friday, July 6, 2012

iCover


iCover
  I bought an iPad in January.  Great thing.  Use it all the time now.  But I discovered that the covers for the devices are very pricey.  I wanted something to cover the screen and protect it from scratches.  Go that, but it was thin and wouldn't protect the whole iPad from knocks and bumps.  Seemed like an important thing to do.  They're not indestructible.  

  So shortly after I got it home, I got out some of my extra yarn and a crochet hook.  I've crocheted laptop covers, iPhone covers, pouches, all manner of things.  Why not an iPad cover?  

  I wanted it snug, so it didn't slip around much.  I also wanted a thick stitch to cushion it as much possible.  Like so many of my custom projects, I made it up as I went along.   It took about 3 tries to get the size right.  The stitch is called basket weave, a favorite of mine.  I've used it for a lot of projects. There is a button hole worked into the front to keep it closed.  Since the flap provides a double layer of fabric to cushion it in the front I made an internal panel for the back side.  That internal panel was a simple flat stitch, that when finished I simply sewed into the cover.  I keep a pair of headphones in that pocket and a cotton cloth to clean the screen if I need to.  It took about a week.

  I was really happy with the results.  The cover provided enough projection that I felt comfortable enough to stick it in my backpack next to my laptop.  Folded in half, it works well to support the iPad when I'm using it and I don't have my iPillow (but that's another post).  

  Then, about a month ago, a good friend from high school bought herself an iPad.  I had more yarn, and her birthday was coming up.  The advantage of making a second one is, simply, I now had a pattern.  It took me four days, maybe about 8 hours, all together, and most of it in about 2 of those days.  Good thing because I was up against a deadline.  I'd gotten a late start.  No fumbling around this time.  I mailed it to her two days before her birthday and it arrived on the day.  Mission accomplished.  She loved it.

  It was a fun, easy project, doesn't require a lot of yarn, and doesn't take that long to complete.  I can making a few more of them in my future.  And I may even write down the pattern if someone else wants to make one.


Friday, June 8, 2012

Fingerless Gloves


Over the winter I made Edward and I each a pair of fingerless gloves.  I'd bought some angora yarn without an real idea what I would do with it, but it was a nice color.  It was hard to work with though.  It didn't like to pull out if I made a mistake.  And there were a lot of mistakes in the making of these gloves.


Edward's were the first ones made.  The palms are double strands.  I made them both at the same time switching from glove to glove so they would be the same.  Didn't really have a pattern for them.  Not that I didn't look for some, and use them as a guide.  But for the most part, I made it up as I went along.  Once both palms were made I started on the fingers...  about 4 times.  They were single strand so they wouldn't be to thick.  After that I turned them around and started making them longer, with a flap in the back. The buttons were from an old shirt Edward had. He got a little use out of them before it got warm.
  

After Edward's gloves I started a second pair, a little smaller.  Started the same way with, the palm, only they were only from the thumb up. Once I had stitched up to the fingers I turned it around and started down.  Once it was long enough, I made a cuff, and then worked on the fingers.

We didn't get much of a chance to use them after they were finished.  It got warm shortly there after.  But the good news is come next winter, we'll be ready.

Monday, March 12, 2012

Glassworks: Discovery


Friends of mine got married this weekend.  It was a beautiful ceremony, intimate with a small party of attendees.  The weather was perfect and setting fantastic.  A cathedral of palms and oaks in a sinkhole turned botanical garden decades ago.  

  The bride and groom are space enthusiasts.  Both wanted to be astronauts long before they met each other.  Both turned instead from studying the stars to studying the earth, and met at a geology field camp.  Studying this one celestial body would, for the time being, take the place of studying the others.  But neither lost their love of the stars.

  So on the day she called me, to say he'd proposed, I knew what they would be getting for their gift.  

  At the time, the shuttle program was still going strong.  The International Space Station was still under construction.  There was talk of going to Mars one day.  And even though the shuttles have now been retired, it still seemed like the right thing to do.

  I've been doing stained glass since high school.  Over the years I've collected a number of tools of the trade: a grinder, special pliers, a cutting board designed to trap glass splinters as the pieces break, even a "foiling table" for wrapping the edges of the glass in copper foil, my preferred stain glass method.  All of this I have on a work bench set up out in the garage.

  I got a late start.  They announced the date about a year ago, but I procrastinated.  Edward looked at me at the end of January and said, "You're running out of time".  Neither of us were sure I had enough time left to finish it.

  I started with a coloring book drawing of the shuttle on the crawler I found on the web. The perspective was off and the details weren't quite right, but it was enough of a basis to start the design.  I did the initial design line work in Illustrator, but then I moved to GlassEye 2000, a wonderful stained glass design program Edward got me about 10 years ago.  It allows you to color the pieces with real samples of glass.  As it turned out, I had most of the glass I needed.  The only color I had to buy was the blue for the sky and some yellow of the rockets.


  It only took four hours to cut out the whole panel, and only one piece didn't break right the first time.  I ended up changing the color of the rocket flames and exhaust, because I didn't like the glass I choose at first.  But after that it was on to the grinding. The first cut is always rough and it ends up looking like there are lots of gaps.  After the grinding, things fit together a lot better.  

  Next comes the foil.  Instead of using lead between my pieces, I use the copper foil method.  You wrap each piece in copper foil tape, which is sticky on one side.  Then you rub, or burnish, the foil to make lie smoothly on the glass.  You can get much finer detail using copper foil.  The pieces can be smaller, letting your design be finer.  I can usually bring the glass inside at this point doing the foiling and burnishing while watching TV.  There is only problem:  as the backing comes off the copper tape, I often get help of the four legged variety.  The girls think the tape backing it there just for their amusement, and their swats and tugs aren't always helpful. 
  Once all the pieces have been foiled, the panel was soldered together.  The solder is a 60%40% lead/tin solder.  I usually masking tape all the pieces together, making sure the final fit is what I want it to be.  Each seam is brushed with flux and the foil is "tinned".  Tinning coats the copper with a thin layer of solder and makes the finishing go more smoothly.  It also joins all the pieces together as a whole for the first time.  The trick next is to form an "I-beam" of solder over each foil seam.  If you're not careful, you'll melt the solder clear through to the other side and end up with a pool of cooled solder.  This usually takes a couple of passes to do, and I flipped the panel from front to back to cover all the seems and check how things look.  Then I washed it, and as is always the case, ended up back out in the garage, touching up this seam or that until I was happy with the way it looked.  

  Once the soldering was finished, I patina-ed the solder.  I used a "black" patina on this piece, which turns the solder a dark gray.  The patina dulls the seams so they don't distract from the glass.  Then applied a coat of glass polish, so that the soldered seams would stay bright.  For this panel, I found a store bought frame to use.  Part of the design, in this case, was to make it to fit in the frame I found.  Once it was built, though, I still had to figure out how to mount it in the frame.  The solution was to buy half inch quarter round moulding at Home Depot.  I used the shop at work to miter the corners and trim one edge of the molding.  A little sanding and some black paint was all it took.  I was very happy with the results.


  The final step was to sign the panel before screwing down the molding.   It took 5 weeks to finish from design to finish.  I didn't work on it every day, I didn't have to.  The progress was quick and went smoothly, even with the problem of figuring out how to mount it in the frame.    I signed it:  "Discovery  Monroe '12"   Because marriage is a journey of Discovery.  And for these two, I can think of no better ship to travel on.

 To Heather and Trent:  All the best.


Wednesday, January 4, 2012

Adventures in Cabinet Making

We needed more space for our DVDs, and a little overflow space for our CD's.  We'd gotten some wood from a friend and had some cedar boards from the trim that was around the windows when we bought the house.  There was plenty of wood, so why not make a match set of cabinets.

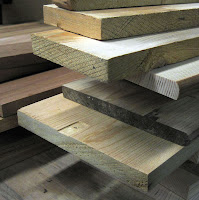
The doors of these new cabinets would be made out of the cedar.  That meant the cedar would need to be joined. When I started the first DVD cabinet I bought pine for the doors that was already joined.  I only had to cut those to size.  This time I would need to make four doors worth of joined cedar, but first I needed to strip all the paint and stain from the top and edges of the boards.   

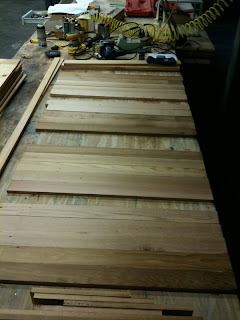
A joiner is a pretty scary piece of equipment.  Almost as scary as the table saw.  I cut the boards down to approximately 32 inch lengths.  That gave me 23 cedar boards to run through the joiner, two edges each.  Next came the planer, which had to be used carefully so as not to damage the blades.  Each board had to be run through multiple times, taking only a little bit of wood and/or paint off each time. Prepping the cedar took the better part of three days, bearing in mind that I was working on these only after putting in my eight hours at work.  

The pine wasn't exactly in the best of shape either.  Five of the six shelf boards had been left outside in the Florida weather for about 8 months.  They had turned gray and one of them had warped.  Those needed to be sanded down to fresh wood and, hopefully, the warp taken out of the one.  It worked, even though that left me with thinner boards.  Luckily, the weight that would be on these shelves was not going to be that great.  

It took a week of an hour or so after work just to prep that wood.  Then I could finalize the design and start on the real work.  Building the cabinets.

Since I wanted a matched set I needed to make them at the same time.  That was nearly the straw that broke the camel's back. I would have had plenty of time to make one cabinet, two cabinets took twice as long... if not longer. 
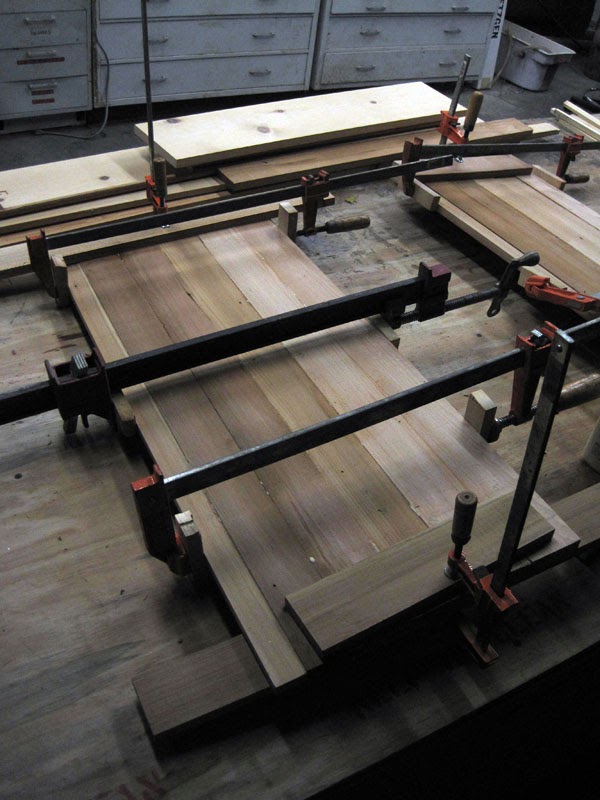
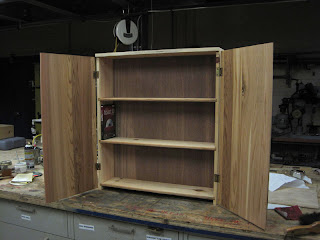
The design was simple. Three shelves each, doors, and a back. With the cedar ready I could start assembling the doors.  Each door was five and a half cedar boards, arranged so that the boards would give me darker color on the outside, lighter boards toward the middle.  Of course in the final sanding, there was no guarantee they would end that way. Each board was joined to the next with biscuits, using a biscuit cutter, a special tool.  The boards were glued together, then clamped tightly and left to set over night.  Once all four doors were glued and set, they were run through the drum sander until all four were smooth and the same thickness.  

Next the slots, called dados, had to be cut into the side boards of the shelves.  Lance and Ron helped set up the dado blade on the table saw, which because of the unusual thickness of the shelves took a little longer then normal.  All four side boards were cut at the same time, so that both cabinets would be the same.  Then the top had to be cut.  It used a "rabbit" cut, a dado without once side.  I also wanted it to overhang the doors. It's what's referred to as a blind cut, so that the top board sits over the doors and has a more finished look.  That required the router to make those cuts.  Using both the dado blades on the table saw and the router table required a little practice before working on my wood pieces.  

By the middle of the second week, I was beginning to wonder if I was going to get them finished before vacation started.  Edward knew I was building these, so I didn't have to make excuses to stay late to work on them. By the end of the second week, I was working 4 or 6 hour days, and filling in my time with credit time I'd earned earlier in the year.  

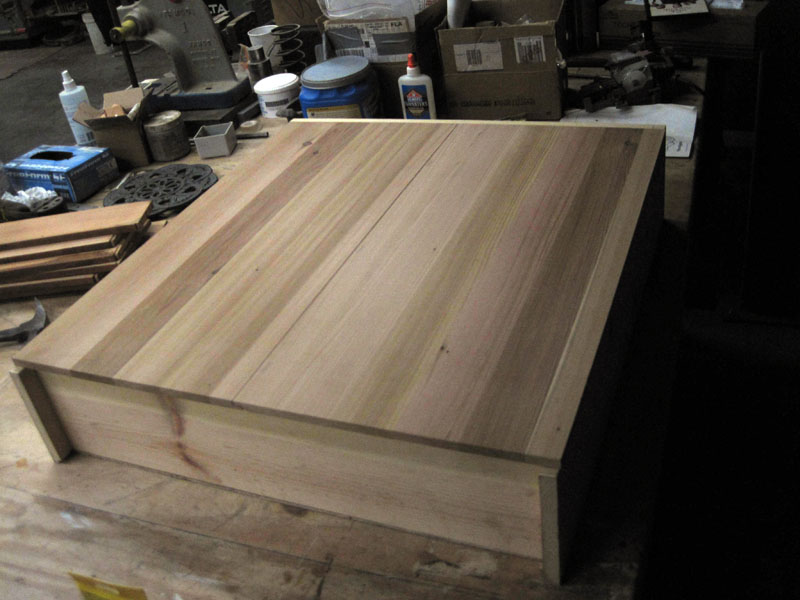
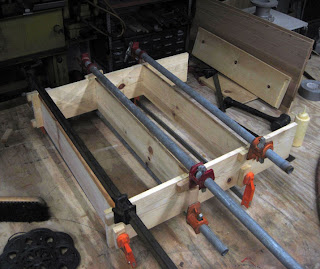
At the beginning of the third week, I glued the shelves themselves together which took two days, one to glue the shelves and sides, one to glue on the tops. The problem was there wasn't enough long clamps to hold everything at once, so that had to be done in stages. It wasn't until Wednesday that I could start the final fitting for the doors.  

I had to custom fit the top of the doors to the tops of the shelves, since neither cabinet was completely square. I started by putting on the backs. I used 1/4 inch plywood and pulled the shelves as square as I could before nailing them in place. Once the top edge was matched to each door, I used that edge to define the bottom. The doors are 28 inches long, slightly longer then the bottom of the bottom shelf. It worked perfectly, with some help from Ron. Next each door had another rabbit cut in the edge. The door overlap 1/4 inch with rabbits on the center edges, one up and one down in each door, that lets the doors lie flat, giving the cabinet a more finished look.  

Lastly, I put on the hinges. I'd done this type of hinge before on Sandy's Box, so I knew what to do.  It required placing the hinge and chiseling out the wood beneath it. Of course, the doors never hang perfectly on the first try and I had to grind the screw holes of the hinges to a slot shape in order to level a few of them and get them to sit correctly. At this point, I am into taking vacation time. The one good thing was that this time of year, it's very slow around the office. There is a major conference in San Francisco. Most folks aren't there, or thinking about starting vacation themselves.  

Once the doors were on I could start the final sanding and put on the handles and door magnets.  I finished that part on Friday afternoon, the day before vacation officially started.  I packed everything into may car and cleaned up my mess in the shop.  I'd finished the construction, but I still needed to stain and varnish them.

I stained the cabinets three days before Christmas. The next two days were putting on the varnish. I put the hardware on the day after Christmas.  Then they had to cure, i.e. de-stinkify, before we could bring them into the house (3 more days) and even then we needed to keep the windows cracked.   

They sit under the window in the dinning room, 1/4 inch below the window sill.  Prefect. I'm really happy with the way they came out. Hopefully, it will be a little while longer before I need to try something like that again.


Rocks In Her Head: